

How To Draw Multiple Turns In Arrow Shape In Word
Call them "doodles," "sketchnotes," or "visual notetaking." Whatever the proper noun, simple hand drawings take become more popular than ever. They're as welcome in the classroom equally they are in the boardroom.


Why? Mayhap information technology's because they're quick to create. Y'all don't have to be an artist to draw stick figures. Yet they communicate everything from how viruses replicate to how a manufacturing supply chain works. They're a expert and unique fashion to heighten your Word documents.
Hand drawings as well allow you to express your personality and stand out from your competition. And because you're creating your own drawings, you don't have to worry nigh using copyrighted materials.


Freeform Word drawings also help you better sympathize and digest the concepts you're trying to convey. That's because you lot're forced to simplify the concepts and come upwards with visual metaphors for them.
You may exist wondering "How practice I draw on Microsoft Discussion?" While Word might not be the first drawing tool that comes to mind, there are drawing tools in Word that you can learn to utilise.
This article shows yous, pace-by-step, how to draw in Give-and-take then that yous, too, can harness the power of simplified drawings in your projects. Every bit you'll see, you lot don't take to exist a professional artist or to employ expensive tools and software because you tin can draw correct within Word.
Let's get started!
(Note: In the examples below, I'm using Microsoft Discussion for Mac version 16. If you're using a different version, then the interface may be different.)
How to Depict in Word: Freehand With the Shapes Freeform Tool
There are several means for y'all to draw by hand on your Discussion certificate. These include the Freeform and Scribble tools in the Shape tab. Both these two tools are very similar because they allow yous draw in Word using your mouse or trackpad.
one. Use the Freeform or Scribble Tool
You can draw objects and handwritten lines with either i. I difference is that the Freeform tool lets yous draw perfectly direct lines, while the Scribble tool draws exactly what yous draw.
To describe with Freeform, click on the Insert tab.


Click Shapes > Freeform.


To draw, click, concord, and elevate the cursor on the folio. Word stops drawing when you lot either bring the cursor dorsum to your point of origin or double-click on the folio. In this example, I'll draw a check mark.


To describe perfectly direct lines with theFreeform tool, click on your starting point. And so, release the mouse, move the cursor to the end of the line, click at that place, and repeat until y'all finish your drawing. Double-click at your end-signal. Using this technique, my check mark looks like this:


Notice that the lines are perfectly straight, even though my hands were unsteady. That's because the Freeform tool draws straight lines between two consecutive points where you click on your mouse.
Don't worry that the text runs straight through the cartoon. Nosotros can gear up this with text wrap because Discussion treats the drawing as an image.
2. Format the Text Wrapping Around Your Cartoon
Click on the Shape Format tab. And then click Conform > Wrap Text. Select i of the text wrapping options. In this instance, permit's select Square.


Now the text wraps effectually the drawing.


Microsoft Word besides lets you wrap text around an irregularly shaped drawing. Go to Shape Format > Adjust > Wrap Text > Edit Wrap Purlieus.


Click and drag the boundary points to change the boundary.


Past doing this, you've got more granular control over how text wraps around your drawing.


3. Refine Your Drawing
Refine the cartoon you've made. Click on your drawing to select information technology. Under the Shape Format tab, click Edit Shape > Edit Points.


Click and drag whatsoever of the points to change the cartoon every bit you wish.
.jpeg)
.jpeg)
.jpeg)
Y'all can also use the Shape Format tab to edit other aspects of your drawing. Modify its color, weight, and in the case of closed shapes, add a filling color.
To change the look of your drawing, from the Shape Format tab, expand the Theme Styles and Presets option. Choose one of the styles you want to utilize.


You'll have more choices by going to Shape Outline. From there, select a color.
To change the weight or thickness of your drawing, get to Shape Format > Shape Outline > Weight.


Yous can also use special effects to your drawing. On the Shape Format tab, go to Shape Effects, then choose the result y'all desire to utilize.
-A.jpeg)
-A.jpeg)
-A.jpeg)
Here's the check marking now, after I added a shadow.


How to Draw in Word: Using the Scribble Tool
The Scribble tool is like the Freeform tool. The only deviation I've seen is that the Scribble tool doesn't draw direct lines between clicks. To depict, you've got to click, concur, and drag the mouse. If you release the mouse button, Give-and-take will cease drawing.
To draw using the Scribble tool, click Insert > Shapes > Scribble.


Click, agree, and drag the mouse to draw the shape. If you bring the cursor dorsum to your indicate of origin, Discussion closes and fills the shape. In this case, permit'southward depict a cloud.


At present the cartoon tin be edited by using the tools in the Shape Format ribbon.
ane. Change the Fill Colour of Your Drawing
For case, to alter the fill color, click on the drawing then on the Shape Fill button. Cull the color you wish to use.


ii. Modify the Outline Color of Your Drawing in Discussion
To change the shape'southward outline color, click on the drawing, click Shape Outline, then choose the outline color or manner you lot desire.


For this example, I selected No Outline.


3. Make full Your Drawing with a Picture
You lot could even fill the drawing with an image. Become to Shape Fill up > Picture.


Find the prototype in your computer. Select the prototype file, and so click Insert.


The resulting shape is pretty neat!


Follow the steps described earlier to change the text wrapping around your drawing, too as its other attributes.
How to Draw With Microsoft Give-and-take Pen Tools
Either Freeform or Scribble are adequate tools for creating simple Word drawings that have only a single element, such as a single line or shape.
Merely what if you desire to draw something slightly more complicated, such as a stick figure? It's made upwards of a circle for the head and several lines for the arms, body, and legs.
1. Describe With the Microsoft Discussion Pen
In this instance, it would be better to use Word's Depict tools. To access them, click on the Draw tab.


As y'all tin encounter, the Draw tab gives you some ink types:
- Pen
- Pencil
- Highlighter
Each ink blazon gives your drawing a different look. To select an ink, click the Describe button on the ribbon, and select either a Pen, Pencil, or Highlighter.
Click, hold, and drag to depict with your mouse. Notice that fifty-fifty when y'all release the mouse, Word stays in drawing style. This means you can keep adding elements to your drawing. When you're done, click the Draw push again.


To modify the color and thickness of any tool, click on the drop-down carte, and brand your selections. A total of 16 standard colors are available, and you tin can admission many more past clicking on More than Colors….
.jpeg)
.jpeg)
.jpeg)
Plus, for the pen ink, there are 8 special effects:
- Rainbow
- Galaxy
- Lava
- Sea
- Rose Gold
- Gold
- Silver
- Bronze


If your drawing has several parts, yous'll have to group them so that Word will treat them as one object. Click, press, and concord the Shift central equally yous click all the elements of your drawing. When you're washed, click Shape Format > Arrange > Group > Group.


Now you lot can care for the drawing as a single object. (Note: Once drawing elements are grouped, they can't exist ungrouped anymore.)
Click on the drawing, Shape Format. And then use the tools in the Shape Format tab. (Note that non all the features on the Shape Format ribbon tin can be applied to your drawing.) From here, we'll change the text wrap setting of the cartoon.
Go to the Shape Format tab. ClickWrap Text. and so select a wrap setting.


I chose the Top and Lesser text wrap.


2. Erase Your Drawing
The Describe tab provides an Eraser tool so you can erase mistakes. Offset, format the tool past clicking on the drop-down arrow. You've got 3 choices:
- Stroke Eraser.Erases an entire stroke when you click on information technology.
- Small Eraser. Erases a small area when you click, concord, and drag your mouse.
- Medium Eraser. Erases a larger expanse when y'all click, hold, and drag your mouse.


If you selected the Stroke Eraser, click on whatsoever line to delete it. If y'all selected either the Minor or Medium Eraser, click, agree, and drag your mouse over any areas you want to delete.
iii. Draw With the Trackpad
Draw in Microsoft Word without a mouse by using the Describe with Trackpad tool.
First, cull the ink type y'all want to utilise. Then click the toggle to switch on Draw with Trackpad.


A window appears on top of your document. Apply two fingers on your trackpad to move it anywhere on your document.
Pressing theCommand key, move one finger on your trackpad to where y'all wish to depict. Interruption, and so draw with your finger. You lot don't have to printing downwards on the trackpad to draw.


How to Draw ... Without Drawing!
So far, you lot've learned how to create your own images in Word by mitt-cartoon with either the mouse or the trackpad.
But what if you lot really tin't draw? Not fifty-fifty stick figures?
You can even so "draw" past using the pre-made lines and shapes in Word. If you recall most information technology, most objects tin be broken down into shapes and lines. By putting these together, you can create your very own sketches — without drawing past manus.
Read on to see what I mean.
1. Draw With Lines in Microsoft Word
The simplest images are made up of lines. In this example, we'll brand a trellis, which is a grid similar what you'd apply to play Tic-Tac-Toe.
Go to Insert > Shapes > Line. This tool makes a simple straight line with a starting point and an endpoint.


Click on the page. That's the starting point of your line. Drag your mouse to where you desire the line to cease, and so click again.
Go to the Shape Format tab and utilise the buttons to edit the line. For this example, I inverse the color and the weight of the line. I also added a shadow.


When y'all're happy with how the line looks, copy and paste it as many times as needed to create your image. Click on the line, then go to Edit > Copy, so Edit > Paste. Or, use the shortcutsControl + C to re-create and Command + V to paste.


Click, concur, and drag the lines into place. It may be helpful to brandish gridlines. To do then, click on the View tab, then bank check the box for Gridlines. This volition help you to properly marshal the unlike elements of your drawing.


To alter the bending of a line, click on the line, then go to Shape Format > Arrange > Rotate. Choose from one of the available rotation options or set your own. You can too click on one end of the line, hold, and drag information technology in identify.


If you lot want the elements to line upwardly precisely, select the lines, then go to Shape Format > Arrange > Align. Select an alignment pick.


In this example, I'll utilise Distribute Horizontally for the vertical lines, and Distribute Vertically for the horizontal lines.


These aforementioned steps use to block arrows and other shapes, too.
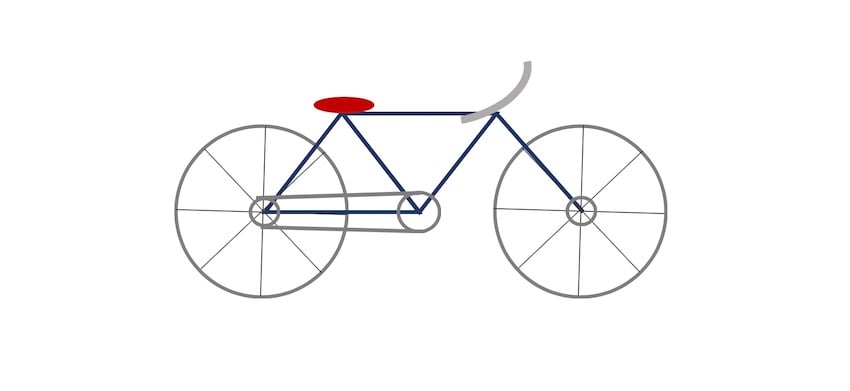
2. Draw on Microsoft Word Using Shapes and Block Arrows
Now nosotros're ready to brand more than complicated pictures!
Let'due south draw a bicycle by combining circles and triangles. Go to Insert > Shapes > Oval. Hold the Shift key equally you click, agree, and drag your mouse to make a perfect circle. (But, if you want to draw an oval, then don't utilize the Shift fundamental.)


With the shape selected, go to Shape Format, and utilize the buttons on that tab to edit the shape you made.


To brand the bike wheels, I'll remove theShape Fill and modify the outline of the circumvolve.


Next, copy and paste the circle. And then follow the same steps to add together the triangles.
Utilise the triangle's turning handle to change its orientation. Click on the turning handle, hold, and drag the mouse to the desired bending.


Add and edit more than lines and shapes to make the image look but like a bicycle. The bike below is made up of circles, triangles, lines, an oval, and a one-half-circle (for the handlebar).
Remember, you tin can brand your drawing as simple or as detailed as yous like. It's all upward to y'all!
Find Professional person Graphics for Your Microsoft Give-and-take Project
Now you know how to draw on a picture in Word. But perhaps you don't accept time to create your own Word drawings from scratch. And you still would rather not use stock photos.
What to practise?
You tin employ premium graphic images from Envato Elements.


An Elements subscription brings thousands of creative tools at your fingertips. This includes print templates for Word , graphics, fonts, photos, and a lot more than. And yous become unlimited downloads for one flat monthly subscription.
Another keen source of premium graphics is GraphicRiver. Equally with Elements, this marketplace gives yous access to thousands of Word templates and other creative tools. These are also professionally designed for maximum bear on. The deviation is, at GraphicRiver, yous pay for each use of every detail.
Utilize each premium graphic on its own in your Discussion document. Or better yet, incorporate them with your ain or other graphics to create something original.
Larn More About Working In Word
As you can see, Microsoft Word has many robust features. Some of them are little-known functionalities such as the various drawing tools in Discussion that I showed you in this article. It pays to learn how to use Microsoft Discussion so you tin maximize its potential. Not only will you be able to realize the vision y'all've got for your Word documents, just you'll also optimize your workflow.
If you aim to produce the most visually compelling materials using Word, then you may find these articles helpful:
You Can Draw in Microsoft Word
Even though Microsoft Word wasn't built for graphic design, it's got some tools to assist y'all draw right inside your Give-and-take certificate.
You can make annihilation from unproblematic line and stick drawings, to more detailed freehand drawings and line illustrations. Employ the Freeform, Scribble, or Draw tools to draw past hand. Or combine lines and shapes to create original Word drawings without drawing from scratch.
Y'all can also discover manus-fatigued graphics and Word templates in Envato Elements and GraphicRiver. If you want unlimited downloads of premium graphics and other design components, then Elements is the place for you. For i-off projects, GraphicRiver is the place to get to access top-quality templates for Microsoft Word and graphics on a pay-per-apply basis.
Yous've but learned how to draw on Microsoft Word. Now, it you're turn to create your all-time Word drawings.

Source: https://business.tutsplus.com/tutorials/how-to-draw-in-word--cms-35635
Posted by: burbankcolooter.blogspot.com
0 Response to "How To Draw Multiple Turns In Arrow Shape In Word"
Post a Comment