

16 Bit Emulator For Windows 7
If you ever found yourself having the urge to play a really old video game or awarding, and all you take is something like windows 7 or Windows eight, you may run into some problems attempting to go that particular programme to piece of work. While a standard xvi bit DOS program may be kind of easy to run with DOSBox, a 16 Chip Windows program may be a picayune more tricky to actually run. This guide volition show you lot the basics of running a basic 16 bit Windows program.
Important Discover: This guide was originally published by me on ZeroPaid. It is existence republished here for the purpose of updating the guide with whatever new information I can obtain so that some of the more than difficult to play games tin can be run.
When it comes to old 16 bit video games, some of the more knowledgeable people would suggest using Dosbox. Dosbox is a plan that emulates the old DOS environment to run quondam 16 bit DOS-based programs such as video games. Unfortunately, some games crave the Windows environment. For users who run Windows Professional, Enterprise and Ultimate, i possible solution is to download and install the "Windows XP Mode" and "Virtual PC". The reason is that Windows XP allowed users to run old sixteen bit video games. Equally such, running the official Windows XP emulator is a possible solution for you. Unfortunately, if you are running Windows Home Premium, Microsoft locks us out of this capability unless you upgrade your version of Windows. So, attempting to run a 16 bit Windows video game in 64 scrap Windows vii Home Premium is mayhap the virtually difficult environment to work with. Is it incommunicable? After years of problem solving, I finally found out that information technology's not impossible.
For any xvi bit DOS programs, one may encounter this mistake message:

Our guide on using DOSBox to run these xvi bit programs are typically sufficient for a number of these games. Nevertheless, if this is a Windows sixteen-Fleck program, you may detect yourself with the post-obit mistake message when trying to boot the programme with DOSBox:
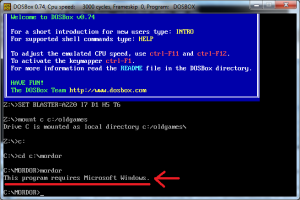
For some people, this may be a message that tells them that they have reached the end of the road in terms of compatibility. For quite some fourth dimension, I was i of those people. However, afterward years of exceptional digging around, I was able to find a solution to this problem. In that location are versions of Windows – namely Windows 3.x) that were actually a DOS program. This means that it's basically a program that runs inside DOS. DOSBox allows y'all to run programs in a DOS environment. This fact makes it possible to run 16 bit Windows games via DOSBox. Hither'south how you essentially create an emulated system that tin run 16 Bit Windows games:
Step 1 – Download and Install Dosbox
Go to the official DOSBox website and download the latest version of Dosbox.
Don't worry about installing a frontend. Frontends are but visualizations of what nosotros are attempting to exercise. Information technology'southward probably all-time to stick to vanilla Dosbox which is what we'll exist doing in this guide.
Step 2 – Obtain a Copy of Windows iii.ane
There are numerous ways of getting Windows 3.1. You lot could purchase a copy or observe some mysterious download version off of some torrent site that rhymes with the pilot day. The pick is yours. Either way, you'll demand to go a copy of the contents of the diskettes (or ISO which would relieve a few steps) onto your difficult drive as most modernistic computers do not have floppy disk drives.
Step iii – A Trivial File Management
Yous'll demand to do a niggling file management to make your life a whole lot easier. I adopt to work out of a binder directly on the chief hard drive to simplify matters. Really, you could place the main folder anywhere on your difficult drive, but locating the files can exist tedious if it's on annihilation other than directly on the "C" drive. Name that folder anything – preferably something that volition allow you to recall later what that folder is for. I chose the name "oldgames"
Next, yous'll demand a binder that emulates the disk drive. I chose to go into the "oldgames" folder and create a folder called "floppy".
For now, this is all that is needed.
Pace 4 – Mount Your "C" Bulldoze
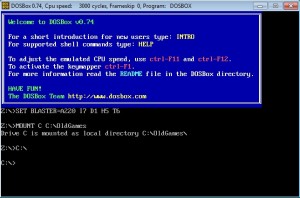
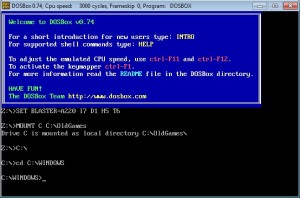
When you first open up up Dosbox, you lot'll see this window:

Yes, nosotros are heading straight into the oldschool DOS prompt. Don't permit it scare you, I'll share with you lot everything you need to know.
Next upward, we need to type in "Mountain C C:\OldGames". Remember, nosotros are using the name of the offset folder we created before here. If you named that outset folder "Old" instead, then y'all'd blazon in "MOUNT C C:\Old". Since I'm using OldGames, this is what I see in Dosbox:

Dosbox is telling me that the drive was successfully mounted hither. Congratulations! Nosotros successfully mounted the hard drive!
Step 5 – Mount Your "A" Drive
The old version operates thinking we have a floppy drive. This is known as the "A" drive. Think of it every bit an outdated version of your "D" drive (which is typically your CD/DVD drive). Way back and then, everything came in thick square disks instead of larger fancier shiny round disks.
Windows 3.1 came in vii diskettes. So, nosotros need to have a way to install Windows iii.1 even though our reckoner doesn't have an A disk drive.
So naturally, we want to mountain the floppy drive. Remember the 2nd folder nosotros created that was chosen "floppy"? That's our adjacent footstep.
Like the "C" drive, we need to mountain the "A" drive. The cool affair is that what nosotros need to type in is very like to what we needed to blazon in to mount the "C" drive. If the second binder you named is also "Floppy", we need to type in "MOUNT A C:\OldGames\Floppy". It should look similar this if we are successful:
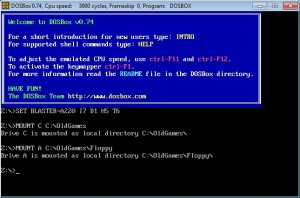
Congradulations! We now have a floppy drive on a Windows seven estimator that physically has no floppy drive!
Step 6 – Begin Installing Windows 3.1
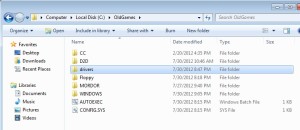
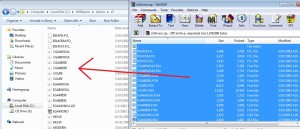
At this point, I am bold you have the contents of all seven diskettes nicely bundled in a folder somewhere on your actual difficult drive. If not, you can do and then now (no harm in going back and doing this. What is ideal is to have the contents of the seven diskettes laid out nicely similar this:
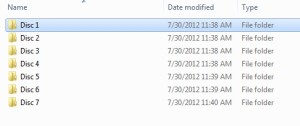
Again, this will make your life substantially easier in this footstep.
Now what you need to practise is go into the binder with the contents of the first diskette and re-create it over to the Floppy deejay folder you lot created earlier (I called information technology "Floppy") like then:
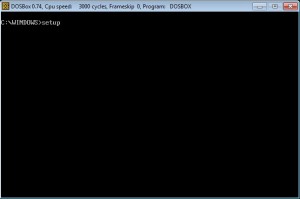
When the contents are copied over, get back to Dosbox and type in "A:\SETUP.exe". When you hit enter, you'll come across the following screen:
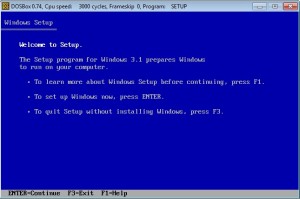
Simply press Enter and y'all'll get this screen:
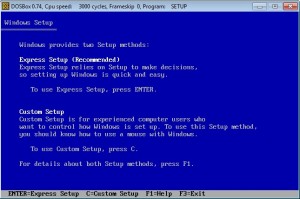
But press Enter again.
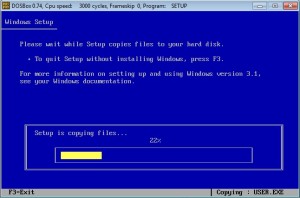
Now information technology volition begin setting upwardly Windows. Equally we can see, the progress for us above has come up to 22%.
Step seven – Swapping Out to Deejay 2
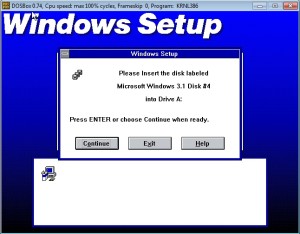
When information technology has finished installing the contents of the beginning diskette, the setup will inquire for the removal of the start diskette and inserting the next diskette.
At this point, y'all'll need to remove the contents of your diskette binder (that we named "Floppy"). One time the files are removed, find the contents of the second diskette and copy it over to the "Floppy" disk binder (much similar what we did in the previous stride. One time the contents of the second diskette are copied over into our floppy disk binder, nosotros go back to Dosbox and printing CTRL+F4. This volition reset what Dosbox thinks is in all the directories. Later that, hit Enter to continue the installation process.
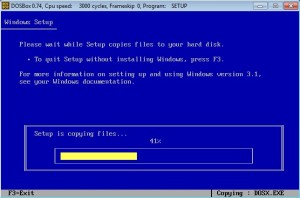
Every bit nosotros tin can see in a higher place, the installation is going along smoothly right at present.
Shortly after this, information technology will prompt you for the 3rd diskette. Again, simply remove the contents of the Floppy diskette folder and copy over the contents of the third diskette. After that, hit CTRL+F4 in Dosbox and hit Enter to keep the installation.
Pace 8 – Installing the Fourth Deejay
Once y'all install the third diskette, you'll be brought to a Windows surround within a Windows surroundings. To switch between the Windows 3.1 and your Windows 7 environment (because now Dosbox is, in a sense, trapping your mouse), simply press Alt+Tab and y'all'll be able to work between both environments.
Afterward it asks you for your name, you'll eventually be brought to this screen:
The process at this stage is exactly the aforementioned. Remove the contents of your floppy diskette drive and copy over Diskette four. Hit CTRL+F4, click inside the Windows iii.1 environment in Dosbox and continue the installation.
You lot'll do the aforementioned procedure of swapping out the diskettes for diskette 5.
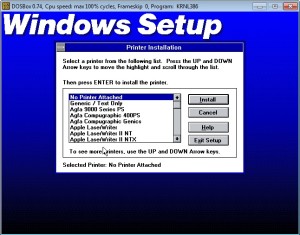
It will, at this point, enquire you if yous would like to install a printer. I simply chose the "No Printer Attached" option and continued. I as well skipped the tutorial as well.
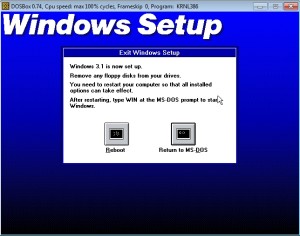
At this betoken, Windows 3.1 will enquire if yous desire to Reboot. I chose to reboot. Dosbox will and so close downwardly.
Stride 9 – Opening Windows
At present that we take installed Windows 3.1, the side by side step is to test to see if Windows will run properly. For that, we need to open Dosbox support.
When nosotros do, we need to mount the "C" drive. For those who don't desire to exercise any extra scrolling, that's, once more (in my example), typing in "MOUNT C C:\OldGames".
In one case mounted, nosotros need to scan to that directory. That'south simply a matter of typing in "C:\".
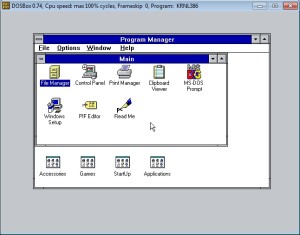
At present that nosotros are on our virtual "C" drive, we need to commencement Windows oldschool mode. We need to type in "cd C:\WINDOWS" and nosotros'll get the WINDOWS directory:
After this, it'southward just a thing of typing in "win" and hitting enter to start Windows. Y'all'll, at this bespeak, exist transported back in time to computing in the early 90′s!
Step x – Running a Game
At this point, we want to encounter if whatever old game would piece of work. Then, I selected a old video game called "Dare to Dream". I exited out of Windows 3.1 and dropped the directory files for the game into the "OldGames" directory. Booted up Windows, went into File Manager, establish the directory for my game, ran the .exe file and, voila, the game actually runs!
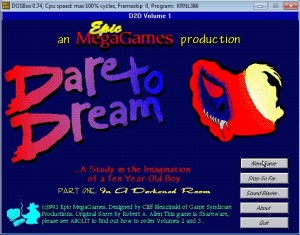
Yes, this is a xvi bit Windows video game running in Dosbox running in a Windows seven Home Premium 64 fleck operating system.
While the game actually runs, there are no MIDI sounds (onetime sound files used to play in the background of some games) because of lack of audio drivers.
Footstep eleven – Installing the Sound Driver
Unfortunately, we don't have any audio. This has to be manually installed. So, we become to the Control Panel.

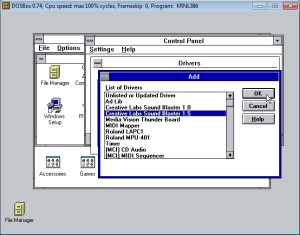
Next, we go into "Drivers". This will bring upwardly this window:
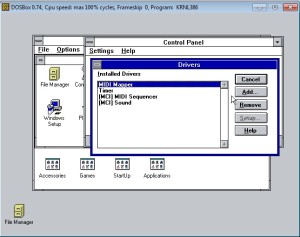
We want to click on "Add together". Side by side, we'll want "Sound Blaster 1.5″:
At this point, it will inquire you to insert deejay 4:
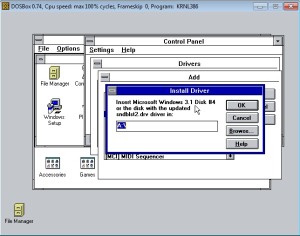
Like before, we remove the contents of the floppy directory on our real difficult drive (if y'all've been following this guide, the contents currently in in that location is diskette 5), then CTRL+F4, then continue. If nil happens, at this point, exit Windows and mount drive A and direct it towards your floppy folder and go dorsum into Windows and attempt again.
If successful, you'll go a screen request for diskette v. Swap out contents of the floppy directory for diskette 5 and keep. One time successful, you'll get a new screen asking for ports and interrupts. This role is truly trial and error, simply the post-obit settings worked for me (the window in the top left corner means you were able to go the settings correct):
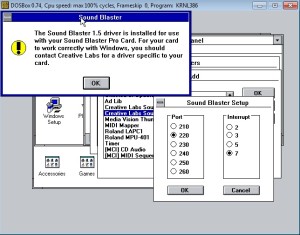
My advice in determining the correct setting apace is to pay shut attention to the error messages. If the error mentions that the port isn't right, alter the port. If the fault message says the Interrupt isn't working, it ways the port is right, but the interrupt is wrong.
At this point, y'all will be asked to restart Windows. Become alee and restart:

Since restarting Windows 3.1 in a modern computer is almost instant, you lot'll probably notice that a restart is pretty much instant. If you hear the erstwhile Windows chime, then that probably means you successfully installed the sound driver. If you want to be certain you lot were successful, you can become into the Control Panel and get into "Sounds":
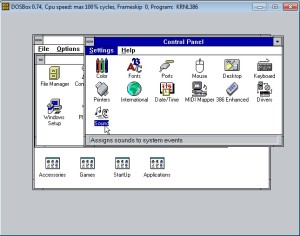
At present, you lot really only need to click on the "test" push to brand sure that the sound really worked. If all went well, you should hear the sound effect you lot selected:
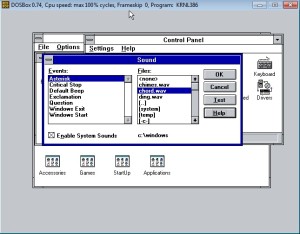
If yous heard anything at all, congratulations! You lot accept sound!
Step 11 – MIDI Mapping
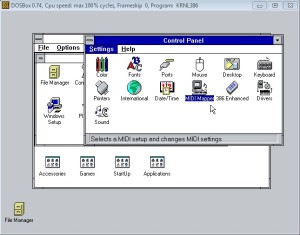
MIDI seems to be a little buggy, merely I can prove you what worked for me. Y'all demand to configure some MIDI settings because former games often used highly compressed MIDI files every bit groundwork music. Starting time, go into the Command Panel and click on the MIDI Mapper:
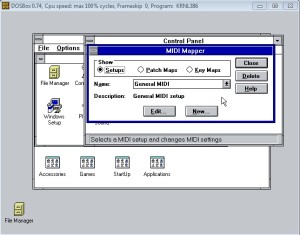
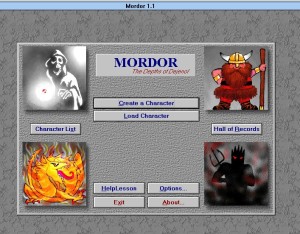
In the MIDI settings, I selected "General MIDI". When I tested the audio for the game "Mordor – The Depths of Dejenol", I still got error messages and information technology occasionally crashed Windows three.1, only despite the error messages, the music even so played. There may be better settings to employ in the mean fourth dimension, but for now, these settings worked:
As a general note for the game "Mordor", you lot need some additional files to get the game to play properly. Just download the compressed file available on the Mordor fan site here and excerpt all the files to the "WINDOWS/Arrangement" folder in the Windows 3.1 directory. In addition, yous'll demand to extract the file "WAVMIX.ini" file into your WINDOWS directory. This should allow the game to at least open upwardly properly.
If Mordor crashes Dosbox, simply remount the A and C drives and go back into Windows again alternatively, simply detect the settings that play the MIDI files and deactivate the MIDI sequences. This could add some stability.
Footstep 12 – Fixing the Video Display
This pace was a scrap of a hurting to figure out, but thankfully, there is a solution that is like shooting fish in a barrel to follow. If you ran whatsoever game in Windows 3.1, y'all may accept either noticed that the colours aren't that great or an error message popular up that said that this game runs better on 256 colours. There is a manner to fix this (and fifty-fifty adjust the resolution of Windows to something that is more suited for your current display.
The trouble hither is that what is running is VGA. There isn't plenty colours to make some of the pictures display properly. While you may be tempted to showtime digging effectually in the Windows Setup to find something better, don't do this. Information technology's all-time to obtain a 3rd party driver instead which is really available.
First, in Dosbox, exit Windows iii.one.
Adjacent, in your regular Windows surround, browse to the folder you've been mounting Dosbox to. Create a new folder. I'll only call this "drivers" to make it easier to remember:
At present, open that directory and create some other directory called "s3″. This will be the name of your drivers you are using. If you lot experience the need to apply different drivers in the futurity, you can simply create another directory in this directory for piece of cake file management:

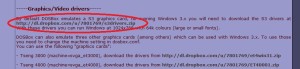
Now to get the drivers. Thankfully, the folks over on a forum with lots of Dosbox fans have posted the needed drivers (as well as their own tutorial about these and other kinds of drivers). What nosotros are after is the file located in the link I circled below:
One time y'all have finished downloading the file, open it upwardly and extract all the contents to the s3 folder:
Now, get back to Dosbox. We are going to install these drivers. Simply type in "Setup" and hit enter:
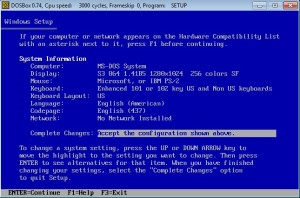
A familiar blueish screen should appear. Use the upwardly arrow fundamental to highlight the line next to "Display". Currently, information technology is set up to the default VGA:

At present, hit enter to go into the video settings. Yous'll exist able to use your arrow keys to choose which display setting you'll use. Use the down arrow key and go all the fashion down to the bottom (holding it down takes you there the fastest). You should discover yourself highlighting "Other (Requires disk provided past a hardware manufacturer)".

This is what we want. Hit enter. You'll then be taken to this screen:
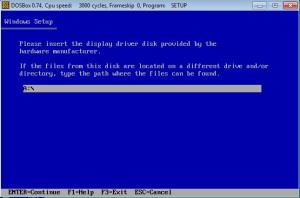
Now, remember where nosotros put our drivers? Yes, we are working from the mounted folder. If you did exactly what I did when creating these folders, y'all can simply blazon in "C:\drivers\s3″:
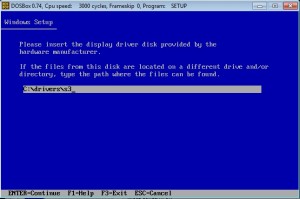
Hit enter.
Later a brief second of loading, you lot'll find yourself on the post-obit screen:

At present, you'll notice that some of these offering something like 64k colours. Since we are talking about xvi bit games, chances are quite good that all we are after is anything in 256 colours (since that is what many are designed to run in). So, you can pretty much pick anything you similar here, but endeavour and choice something that ends in either "256 colors SF" or "256 colors LF" (LF is short for Large Font and SF stands for Pocket-size Font. I personally chose anything with a modest font myself).
You'll then find yourself on this screen:
Simply press enter at this signal. If this is your first fourth dimension doing this, you lot'll be prompted for the directory that the drivers are located again. Simply re-blazon in the same driver location as before and hit enter. This is merely for people who practice this the first time. Subsequently that, you'll but ever be prompted to type in the directory once every time you want to change the resolution. If there are any additional screens beyond this, just hit enter until you finally discover yourself dorsum at the dos prompt. Type in "win" and hitting enter to go back into Windows. Yous'll find that the resolution is greatly altered.
Yous tin can now freely play many classic sixteen chip Windows video games like Mordor smoothly on Windows 7 Home Premium 64 scrap!
Questions and Answers
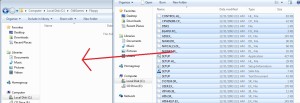
Q: What kind of memory footprint are we looking at for something like this?
A: For me, at the resolution (the 2nd highest at 256 colours SF), my memory footprint while running one game looked like this:
In short, big name browsers with a handful of tabs can take upwardly way more than than what you see in Dosbox.
Q: Can something like Windows 95 work on Dosbox?
A: I honestly don't know how possible that is. 1 thing to remember is that the newer the operating system, the more memory it will take upward to emulate the same game. Chances are good it isn't really worth information technology and if information technology's newer than the two games I mentioned here, there'due south also a possibility that information technology operates on a 32 flake organization which can run on Windows seven. Emulating information technology via Dosbox would be redundant. In any event, Windows 3.i is basically a shell program that runs on DOS. Later versions don't run quite similar this, making information technology much more difficult to emulate (if it's possible at all).
Q: What about running these programs under WINE in Linux?
A: This is an thought I have toyed with. Unfortunately, the experience of other people seems to suggest that WINE can be buggy. This manner, the game is operating in a native Windows surroundings – an operating arrangement that the games were designed for in the commencement place.
Q: Couldn't you but duelboot a different operating system to run these games?
A: That is definitely a possibility. However, I adopt something similar this because, this way, no hard drive sectionalization would exist necessary. You can also run a virtual machine as well. I have no idea what kind of retentivity footprint is required there, only the process also requires a certain amount of configuration merely to go the emulated operating system to run.
Q: Why won't 16 bit video games run on 64 bit environments?
A: The short respond is that information technology has to do with coding. We're talking different pin fries here. There is currently no real way to run a 16 bit video game in a 64 bit environment as the ii are incompatible with each other. This emulator theory is about one of the best ways to accomplish playing a 16 chip video game in a 64 bit environment.
Q: Do all 16 scrap video games require installing Windows?
A: No. Many sixteen bit video games run straight off of DOS. This means you can just open up Dosbox, mountain the C drive and run an executable file to run the game. If a game requires the Windows environment, Dosbox will inform you of this. Both Dare to Dream and Mordor 1.1 require the Windows environment which is why both were demonstrated here.
Q: My game all the same won't run! It has errors in it/Information technology says that files are missing!
A: Every bit I suggested in the midst of this tutorial, some games crave additional files. Google, in this case, is your friend. Yous tin can promise that in that location is a fan site or even an official website still running that has any additional files required to run the game (like I did with Mordor 1.1). Non every game will run direct out of the box and if you exercise get any missing files, it can exist a case of trial and error to get the game running. Different games have different requirements. The simply way to know if a game works is to actually endeavour to run it.
Q: Will this work on old full general applications besides?
A: This should be a slap-up way to endeavor and go general 16 bit Windows applications to run every bit well. Again, it'due south entirely possible to run into similar problems as well (i.east. missing files, etc.) Again, effort it out to see if it works.
Q: Where tin can I get Windows three.1?
A: There are lots of ways. Look for it. It'south proprietary software, and so just linking to it might be legally questionable. Still it isn't too hard to discover.
I promise this guide proves useful for those who are trying to run quondam applications again. I've read about many people being unable to run old applications that require the Windows environment, but are stuck on Windows vii Home Premium which is why I wrote this guide.
Update
If you detect that the game is freezing and you know it normally requires a Floppy drive, endeavor using this guide to get the game running.
Source: https://www.freezenet.ca/guides/compatibility-and-emulation/how-to-play-16-bit-windows-gamesapplications-on-a-64-bit-computer/
Posted by: burbankcolooter.blogspot.com
0 Response to "16 Bit Emulator For Windows 7"
Post a Comment