

How To Draw A Sofa In One Point Perspective
1, 2, and 3-Point Perspective
Submitted by: Barbara Rhodes, retired art teacher
Title: 1 Signal Perspective
Unit: Offset Art Perspective
People across the world seem to have a difficult time grasping the concept of perspective drawing. Hopefully these lessons will help people understand one, two, and three point perspective. Although these lesson are at the high school level, most students however take a difficult time grasping the concept. Because of this, a more than difficult one-indicate perspective lesson is presented first.
Whatever perspective lesson should comprehend famous art that centers around audio perspective. Links to art by M.C. Escher, Brunelleschi, and Piero della Francesca are below. Francesca uses linear ane-signal perspective to center the attending to a baptistery door in his painting called, "View of an Platonic Urban center."
 Florentine sculptor and architect, Fillipo Brunelleschi, was the first architect to use mathematical perspective when designing buildings during the early Renaissance. Before this time, artists guessed where the lines of buildings would get in their drawings. These drawings tended to await skewed and awkward.
Vocabulary
Horizon line: Where the sky meets the ground, a horizontal line.
Vanishing point: The place where all lines meet or "vanish," it is located on the horizon line
Perspective: a signal of view involving space (POA); to show distance/depth.
Horizontal line: A line that goes left to correct, it is parallel to the horizon line
Vertical line: a line that goes up and downward, it is perpendicular to the horizon line
Orthogonal line: lines that create the sides of an object in one point perspective, these lines are drawn to the vanishing point.
Diagonal line: Lines that have a slanted direction.
Perpendicular line: Lines that intersect or form right angles (90 degrees)
Intersecting line: Lines cut or divide by passing through or beyond
Parallel line: Lines that are in the same plane merely never meet (intersect) no thing how far extended.
One Signal Perspective
Process:
1) On 12 x 18 [xxx.5 x 45.7 cm] white Drawing Paper


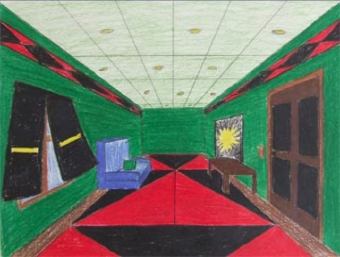
two ) Students volition add together additional lines from the middle point that will become the tops and bottoms of chairs, doors, windows, etc. The pupil will choose a specific decor such as a hallway interior, bedchamber, or school room. The instructor tin focus on a specific medium or let the pupil decide what to use. Every bit an extension, students may imitate a famous artists style or subject matter.
Examples below are done in both pencil and colored pencil. Click on the images for full size.


Materials
Drawing Newspaper
Colored Pencils

Drawing Pencils
Magic Rub Erasers
Rulers
Perspective Cartoon PowerPoint
Introduction to Perspective PowerPoint
Two Point Perspective PowerPoint
Three Signal Perspective Amazing Maze PowerPoint
2 Point Perspective
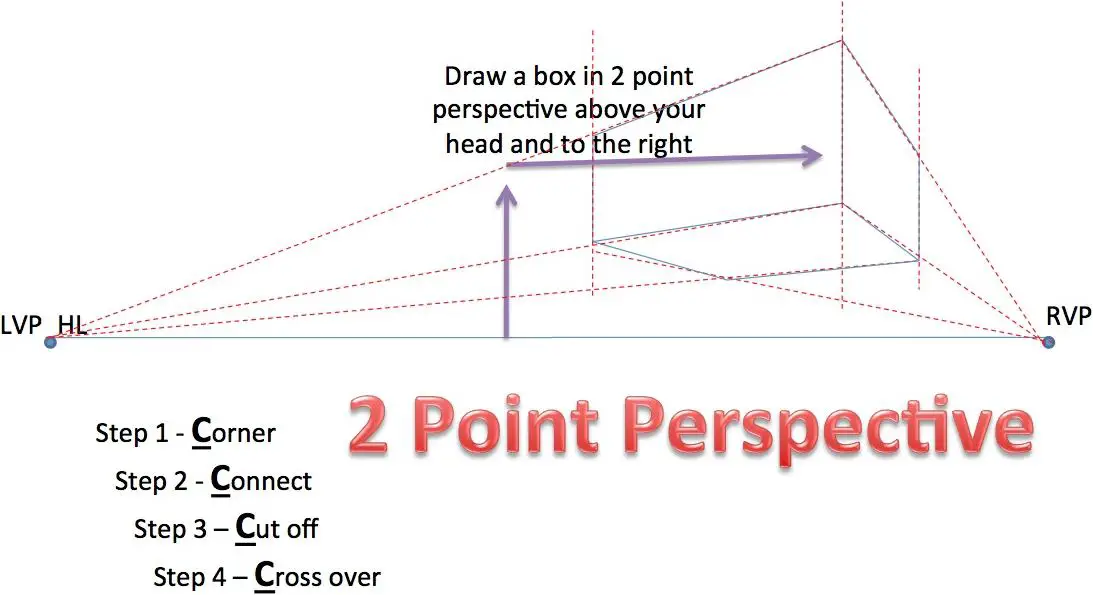
Two point perspective is slightly more difficult because you are cartoon objects with a second bending. Instead of just one vanishing betoken, you at present take two. Usually each point is on the far left and far correct of the paper. Y'all should use two-indicate perspective when y'all are looking at an object at an angle that is not head-on. In the drawing below you see the showtime of the foundation of a building or a maze.

When your lines get below the horizon line, the object will either announced to be below yous or testify up equally you lot would see it from your ain vantage point. If the object is likewise alpine, you would demand a third point for your perspective drawing. A possible introduction to prepare students for the ii-point perspective would be for them to create a maze from in a higher place. The maze should take some height, simply non enough so you tin't encounter within. The above illustration shows how you would start such a maze. Y'all can use this same discipline for a three betoken perspective project (Come across bottom).
Procedure
Post-obit your maze introduction project (listed above) students are now ready to draw a creative 2-indicate perspective drawing. One such project would be a ii-point perspective viewed from below. Students would be creating floating structures. The movie, Up
1) About the bottom of the folio, utilise a ruler to create a horizon line. On each end of the line, create a vanishing point. Brand sure all your lines are light enough to easily erase. Make a vertical line on the page where yous want the front corner of the house to be. Draw a line to each vanishing point from the top and bottom of this line. The line MUST be in a higher place the horizon line. You tin can now utilise two more vertical lines to create length and depth for your home. If you want a longer home, then the forepart side will accept the vertical lines further autonomously. From the bottom of these new lines, have them become to the same vanishing points. An easy way to recollect this process is to employ the four "C'southward," Corner, Connect, Cut-off, and Cantankerous over. (Come across illustration beneath)
2) Y'all can now add more details. Similar the "Upwards" firm below, in that location is an extension for the roof, a porch, a chimney, and wood or vinyl siding. All of these details will follow the same rules for 2-point perspective. More avant-garde students can take on more details. They may likewise add additional buildings such every bit a garage or neighbor's home if time allows.
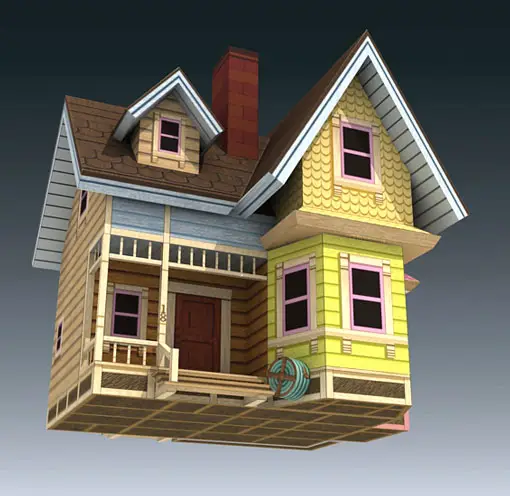
3) Erase whatever lines that aren't office of the house such as lines that continue on to the vanishing points. Students can now add color to their drawings. Students will utilise colored pencils to add the color. Prismacolors provide a richer color merely are usually more expensive. Remind students to add shadows and consider where their light source is. As in the picture higher up, students should add some item to the bottom of the house and not take simply one color. The picture shows floor joists.
Notation: The higher up illustration is actually using 3-point perspective but the third angle is barely visible and will fit ii-point nicely.
Materials
Up
Cartoon Pencils
Charcoal Pencils

Sulphite Drawing Paper
Magic Rub Erasers
Rulers
3 Point Perspective
Usually, a 3rd point is used in perspective when in that location are extreme heights (or depth) such as skyscrapers. When viewing skyscrapers from the sidewalks below, the buildings appear to get smaller as they ascension. The edges of the edifice will non just recede to the two vanishing points from a corner, there will be an upward (or downward if you are flying over the buildings and creating a bird's eye view) recession to a vanishing signal.
Yard.C. Escher uses three-point perspective in the link at the bottom called, Ascending and Descending
Procedure
This is an introduction to three betoken perspective and non intended to be for avant-garde students. Students are cartoon a chair in the art room (or whatsoever room your youth is in) in 3 dimensions.
1) Find a chair in the room and stand near iv or 5 feet away from it (1.2 - i.5 meters). Look down on it and draw a quick sketch on small newspaper of the chair as you run into it. At this bespeak it is possible students will non sketch it correctly because of the bending. Bring the sketch dorsum to your piece of work space and describe a horizon line almost the top of the page. Mark a vanishing bespeak on both ends of the horizon line. Mark a third vanishing point at the bottom of the paper centered over the identify you want your chair to announced.

two) Using their quick sketch as a guide, they will now draw lines from each vanishing point. If the vanishing points are all on the paper, the chair will appear distorted and exaggerated. To overcome this, the pupil can marker the vanishing points off the picture aeroplane of the paper (See illustration above) and use a tack and cord to mark the lines. They may besides employ a m stick to follow the lines from the vanishing points to the flick plane.
3) Once the cartoon is completed, details and color may exist added as time allows.
Alternate: Students can use the maze listed in the two point perspective project and add together a third dimension to make a three-signal perspective maze. Students will add watercolors when finished. See educatee samples beneath. Click on the images for total size:


Resources
Lesson Links
One Point Perspective - by Harold Olejarz
Bunki Kramer's lesson
Perspective Drawing by Andy DiConti
How to Draw a House in Two Point Perspective
Linear Perspective by Michael Delahunt
DeChirico Inspired Perspective lesson by Stephanie Royko
Perspective in Art Links
View and Perspective of the Hotel de Mars (One bespeak perspective) by Gabriel Perelle.
The Nave of the Church by Filippo Brunelleschi
Old Sacristy by Filippo Brunelleschi
Tower of Boom-boom - Three Signal Perspective by M.C. Escher
Escher Mezzotint, 1946
Arise & Descend by Escher
Perspective view of the Chateau, 1668 by Pierre Patel
Books
Perspective Fabricated Easy
Perspective Without Hurting
The Magic Mirror of M.C. Escher

Source: https://www.incredibleart.org/lessons/rhodes/perspective.html
Posted by: burbankcolooter.blogspot.com
0 Response to "How To Draw A Sofa In One Point Perspective"
Post a Comment